2018. 8. 8. 16:09ㆍHeroku
How to Host Parse Server and Its Dashboard on Heroku

Create an account on Heroku
In order for you to host Parse Server on Heroku, you need to first create a free account on heroku.com. If you want to get 1000 dyno free hours, you need to add your Credit Card details in your Account settings.
I would suggest you to do that, you won't be charged a penny until you will exceed the 1000 free dyno hours. This means that you can use the Heroku server for your Parse app(s) for about 41 full days before getting charged per hour, 41 days are a long time :)
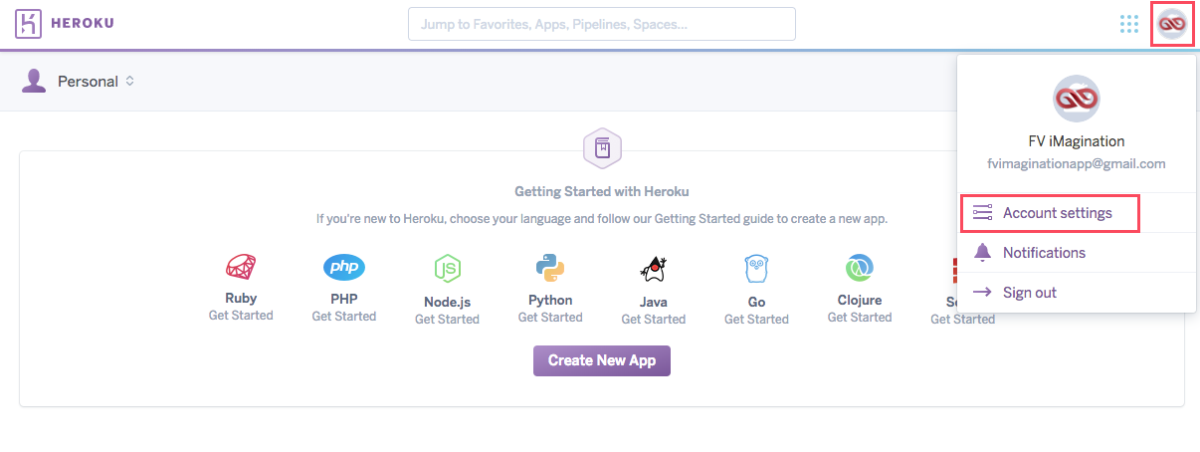
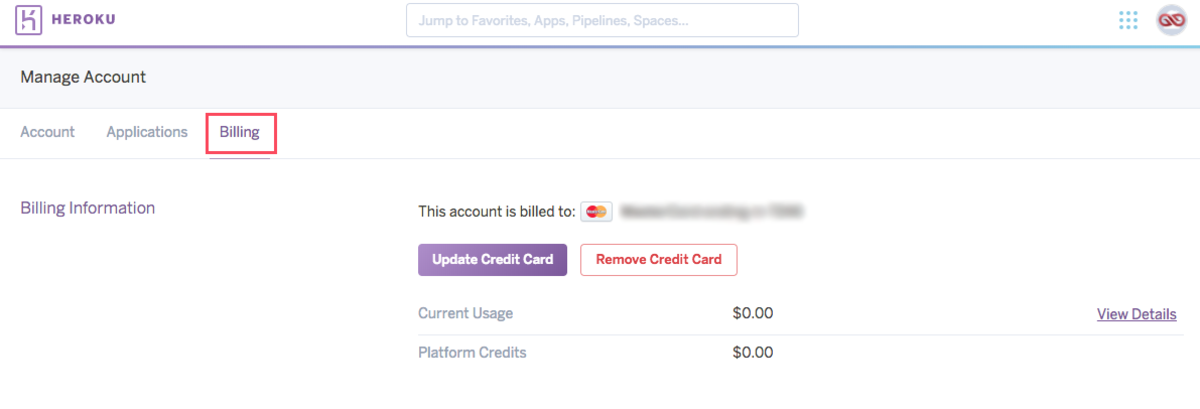
So, after signing up un Heroku, click your avatar and enter Account settings -> Billing section and add your credit card number. Don't worry, you'll be promptly notified by email when you're free dyno hours will be almost finished.
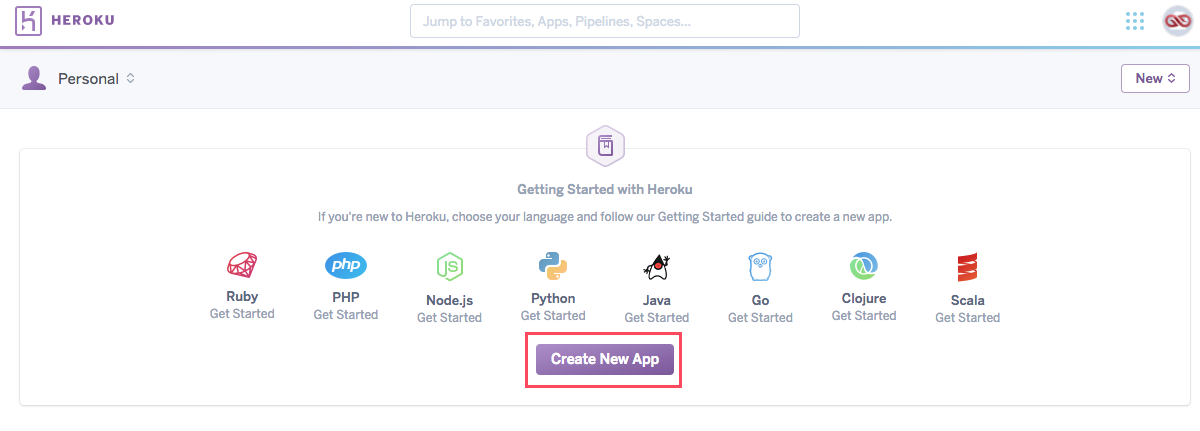
Go back to the home page and click on Create New App.
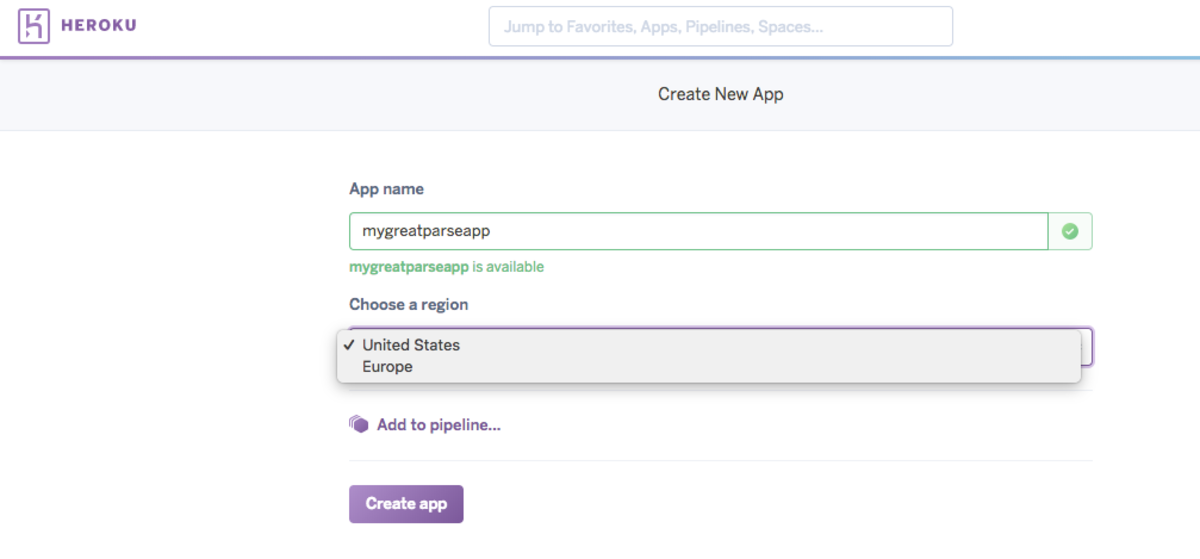
In the next screen, type your app name. Please note that it must have all lowercase characters and it can contain the dash symbol between words.
Choose a hosting Region. You can select the region you wish, of course, if you're closer to the US, select United States option, otherwise, select Europe.
Lastly, click Create app.
After creating the app, you'll be redirected to the Deploy section, where you can download and install the Heroku CLI, available for Windows and macOS. the Heroku CLI is the plugin that will allow you to download and upload the files of your app and the Parse Server GitHub repository.
So click on the Heroku CLI link, scroll down to the MacOS Installer section and click on MacOS installer. (Or the Windows Installer link in case you have Windows. Please note that this tutorial is written using a MacBook).


Once you have downloaded the Heroku CLI, install it on your computer by following the setup steps on the Installer.
When the installation is done, go back to your Heroku dashboard and enter the Resources tab.
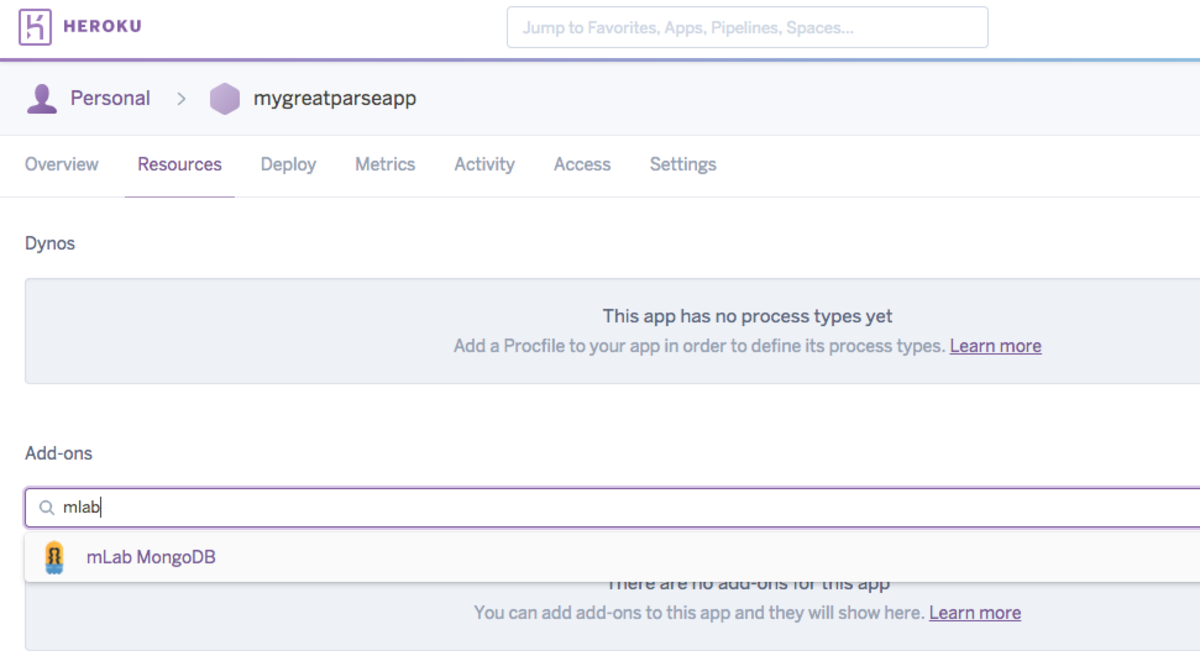
In the Add-ons section, type mlab and select the mLab MongoDB option.
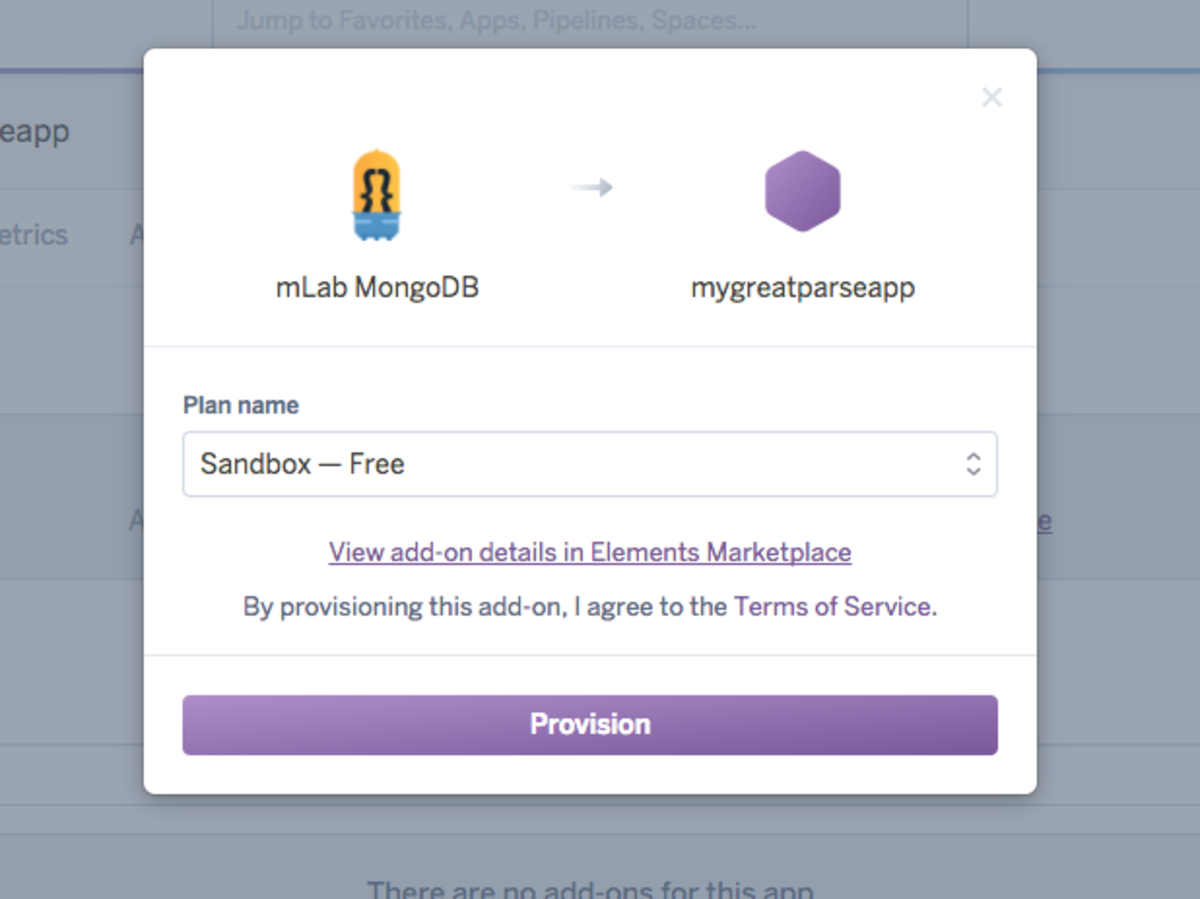
Select Sandbox - Free option and click the Provision button in the popup window that will show up after selecting MongoDB. This will add MongoDB to your app, which is needed to communicate to Parse Server.
Clone your Heroku app and Parse Server
Once the MongoDB installation is done (it may take just a few seconds), you'll see the following sentence in the Resources tab:
The addon mongolab has been successfully installed.
Now enter the Deploy tab again, scroll down and let's start by cloning the Parse Server GitHub repo together with your Heroku app. In order for you to do that, you need to open the Terminal app, navigate to your Desktop (just to simplify things) by typing cd Desktop/ and pressing Enter. The cd command in Terminal is used to change directories. If you want to see the files contained in a folder, type ls and hit Enter.
Once you're in the Desktop directory, you need to login on Heroku with your credentials, so type:
and press Enter. Wait for a few seconds and the Terminal will ask you to enter your Heroku credentials, which will be email and password. So type the email address you've used to register on Heroku and hit Enter. Then type your password and hit Enter again.
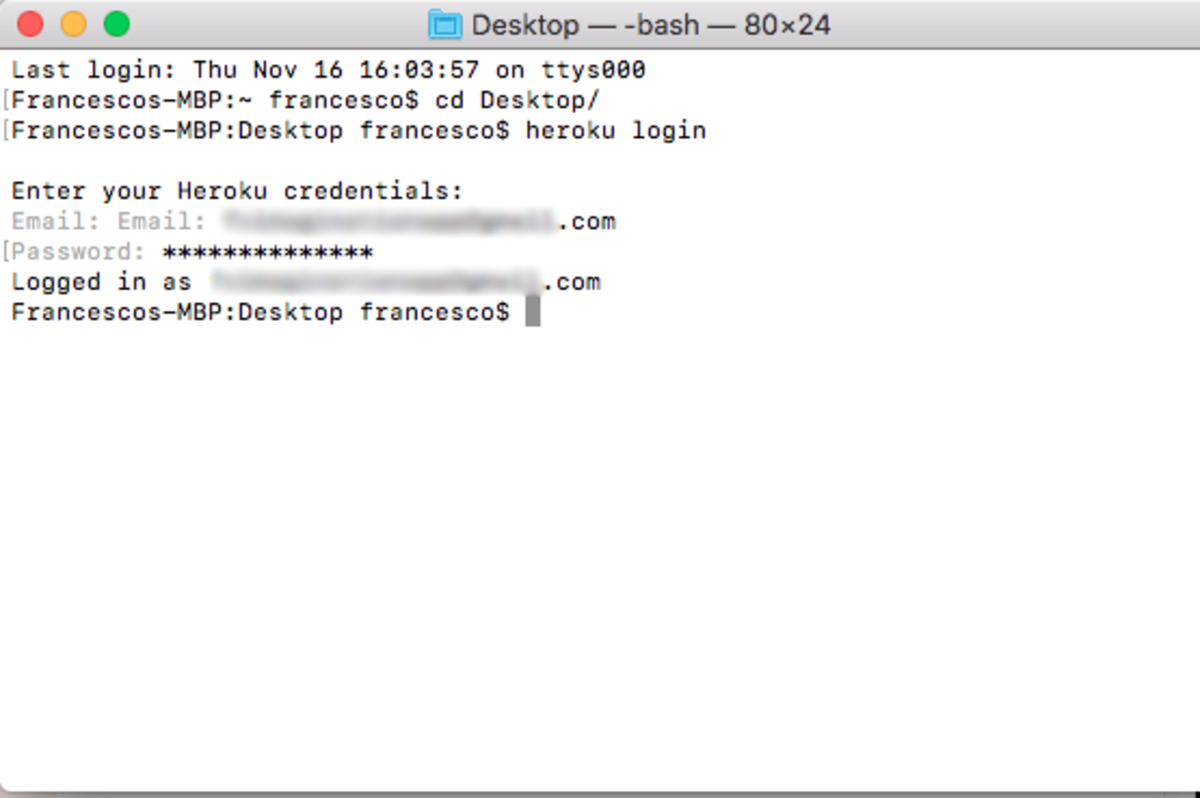
You're now logged in on Heroku and can perform all clones and uploads for your app.
Start by cloning your Heroku app and Parse Server example GitHub repo, the command you need to type is similar to the following one:
1 | git clone https://github.com/parse-community/parse-server-example.git your-app-name |
As you could see by the screenshots above, I've named my app as mygreatparseapp, so the command I'll have to type in the Terminal is:
1 | git clone https://github.com/parse-community/parse-server-example.git mygreatparseapp |
In case you are already following the steps of this tutorial in practice and have given another name to your Heroku app, just replace mygreatparseapp with your app's name, and press Enter.
Wait for a while until the process is done (you can see it when the cursor shows up again next to the $ symbol), and check your Desktop, you should now see a folder named as your Heroku app (in this example: mygreatparseapp).
Configure Parse Server app
You need to edit the index.js file included in your app's folder, it contains all the Parse Server keys for your app.
First, you need to copy the URI of your MongoDB, you can find it in the Settings tab of your Heroku app. Click the Reveal Config Vars button to see your app's MongoDB URI, copy it and open index.js with Sublime Text or any other text editor.


Search for the following line in index.js:
1 |
Replace mongodb://localhost:27017/dev with the MongoDB URI you've previously copied from Heroku.
Go back to your Heroku Settings page and scroll down to the Domains and certificates section, copy the Domain URL and use it to replace http://localhost:1337/parse in index.js.

1 |
So, in this case, the databaseURI and serverURL variables will look like this:
1 2 3 | databaseURI: databaseUri || 'mongodb://heroku_hnrqm9r5:jbkhr2729hcpk0tru2v6sr28or@ds111476.mlab.com:12379/heroku_hnpqk9r5', |
As you may have noticed, I've placed "/parse" at the end of the Domain URL, that's needed in order to communicate to Parse Server so don't forget to add that suffix after posting your URL in index.js!
Now it's time to create the necessary keys to make your Parse app unique and secret. For the sake of this tutorial, I'll post the entire code of my edited index.js and explain you what to change:
1 2 3 4 5 6 7 8 9 10 11 12 13 14 15 16 17 18 19 20 21 22 23 24 25 26 27 28 29 30 31 32 33 34 35 36 37 38 39 40 41 42 43 44 45 46 47 48 49 50 51 52 53 54 55 56 57 58 59 60 61 62 63 64 65 66 67 68 69 70 71 72 73 74 75 76 77 78 79 80 81 82 83 84 | // Example express application adding the parse-server module to expose Parse// compatible API routes.var express = require('express');var ParseServer = require('parse-server').ParseServer;var path = require('path');var databaseUri = process.env.DATABASE_URI || process.env.MONGODB_URI;if (!databaseUri) { console.log('DATABASE_URI not specified, falling back to localhost.');}// PUSH NOTIFICATIONS CONFIGURATION ------------------------var pushConfig = {};// Google Cloud Messaging (GCM)if (process.env.GCM_SENDER_ID && process.env.GCM_API_KEY) { pushConfig['android'] = { senderId: process.env.GCM_SENDER_ID || '', // paste your own GCM Sender ID apiKey: process.env.GCM_API_KEY || ''}; // parse your own API Key}// Apple Push Notifications (APNS)if (process.env.APNS_ENABLE) { pushConfig['ios'] = [ { pfx: 'ParsePushDevelopmentCertificate.p12', // set the name of your .p12 certificate bundleId: 'beta.codepath.parsetesting', // set your app's Bundle Identifier production: false // switch it to "true" in case your .p12 certificate is a Production one } ]}// PARSE APP CONFIGURATION ------------------------------------------------------------------var api = new ParseServer({ databaseURI: databaseUri || 'mongodb://heroku_hnrqm9r5:jbkhr2729hcpk0tru2venr28ek@ds111476.mlab.com:11476/heroku_hnrqm9r5', cloud: process.env.CLOUD_CODE_MAIN || __dirname + '/cloud/main.js', appId: process.env.APP_ID || '123456789', // set your App ID (type whatever you want) clientKey: '123456789', // set your Client Key (type whatever you want) javascriptKey: '123456789', // set your Javascript Key (type whatever you want) restAPIKey: '123456789', // set your REST API key (type whatever you want) dotNetKey: '123456789', // set your .NET Key (type whatever you want) masterKey: process.env.MASTER_KEY || '123456789', // set your Master Key (type whatever you want) serverURL: process.env.SERVER_URL || 'https://mygreatparseapp.herokuapp.com/parse', // Don't forget to change to https if needed liveQuery: { classNames: ["Posts", "Comments"] // List of classes to support for query subscriptions }});// Client-keys like the javascript key or the .NET key are not necessary with parse-server// If you wish you require them, you can set them as options in the initialization above:// javascriptKey, restAPIKey, dotNetKey, clientKeyvar app = express();// Serve static assets from the /public folderapp.use('/public', express.static(path.join(__dirname, '/public')));// Serve the Parse API on the /parse URL prefixvar mountPath = process.env.PARSE_MOUNT || '/parse';app.use(mountPath, api);// Parse Server plays nicely with the rest of your web routesapp.get('/', function(req, res) { res.status(200).send('I dream of being a website. Please star the parse-server repo on GitHub!');});// There will be a test page available on the /test path of your server url// Remove this before launching your appapp.get('/test', function(req, res) { res.sendFile(path.join(__dirname, '/public/test.html'));});var port = process.env.PORT || 1337;var httpServer = require('http').createServer(app);httpServer.listen(port, function() { console.log('parse-server-example running on port ' + port + '.');});// This will enable the Live Query real-time serverParseServer.createLiveQueryServer(httpServer); |
You may copy the entire code above and use it to replace the code in your own index.js file, it will be faster for you, although you need to edit the following lines:
42: replace '123456789' with your own App ID, type in whatever you wish. This key is needed to connect your Parse app to an iOS or Android app that uses Parse SDK.
43: replace '123456789' with your own Client Key. This key is needed to connect your Parse app to an iOS or Android app that uses Parse SDK.
44: replace '123456789' with your own Javascript Key. You'll need this string in case you'll develop a Javascript Parse app.
45: replace '123456789' with your own REST API Key. This is needed in case you are planning to use the Parse REST API.
46: replace '123456789' with your own .NET Key, in case you need .NET access.
47: replace '123456789' with your own Master Key. This is a secret key to be used in case you write a web application with the Parse PHP SDK.
When you're done, save your index.js file and get back to the Terminal, we're going to push (upload) your changes to Heroku.
Push your app to Heroku
You need to navigate into your own app's folder in Terminal. I assume your cursor is still into the Desktop directory, so type:
and hit Enter (again, please note that mygreatparseapp/ is the name of my demo app for this tutorial, you need to replace it with your app folder's name).
Once you're inside your app's folder, type the following lines and hit Enter every time you finished typing a command (wait for the cursor to show up again, it may take a few seconds to the Terminal to process each command):
1 2 3 4 5 | git initheroku git:remote -a mygreatparseappgit add . git commit -am "changes applied"git push heroku master |
After running the last command, you'll see that the Terminal will print out some logs about the process it's doing. You'll know that everything went fine when you'll get the following line:
You're finally ready to setup your Parse app with your iOS, Android or Web PHP site by using the keys you've previously configured. I'm going to post the initialization code for an iOS, an Android and a web PHP application.
Please note that everytime you'll make changes to the index.js file, you'll need to push your changes to Heroku by using only the last 3 commands:
Initialize an iOS app
Open your app in Xcode, and in AppDelegate.swift, inside the 'didFinishLaunchingWithOptions()' method, paste the following code:
1 2 3 4 5 6 7 | // Init Parselet configuration = ParseClientConfiguration { $0.applicationId = "123456789" $0.clientKey = "123456789"}Parse.initialize(with: configuration) |
Again, the applicationId, clientKey and server strings must be the ones you have set in your index.js file, the code above reports the ones for the demo app of this tutorial.
I assume your iOS app has already the Parse.framework integrated so you're now ready to go, run your app and test it out (query or save data, login or sign up, etc.).
Initialize an Android app
Open your app in Android Studio and enter the Application java file you created to initialize Parse (for instance, in my app templates that file is called Configs.java).
Paste the following code in it:
1 2 3 4 5 6 7 8 | Parse.initialize(new Parse.Configuration.Builder(this) .applicationId(String.valueOf("123456789")) .clientKey(String.valueOf("123456789")) .build() );Parse.setLogLevel(Parse.LOG_LEVEL_VERBOSE);ParseUser.enableAutomaticUser(); |
As mentioned above about the iOS setup, you need to set the applicationId, clientKey and server strings based on the ones you've set in the index.js file of your Heroku app.
I assume you already have integrated the Parse SDK in your build.gradle file of your Android Studio project and you're ready to go, so run the app and test it out.
Initialize a web PHP application
Open the PHP file you use to set all configuration (for example, in my PHP templates such file is called Configs.php) and paste the following code:
1 2 3 4 5 6 7 8 9 10 11 12 13 | ParseClient::initialize( // REPLACE THIS STRING WITH YOUR OWN App Id '123456789', // REPLACE THIS STRING WITH YOUR OWN Rest API Key '123456789', // REPLACE THIS STRING WITH YOUR OWN Masketr Key '123456789');ParseClient::setStorage( new ParseSessionStorage() ); |
once again, I assume your website contains the src folder with the Parse PHP SDK and you're ready to go, so just open your browser and go to the index.php of your website to test it out.
Setup the Parse Dashboard
If everything worked fine with your tests, it's time to set up a Parse Dashboard to see and edit your data. You'll deploy the Parse Dashboard into your Heroku account as a new app and such Dashboard will host all your Parse apps, this means that you set up the Dashboard once.
So go to your Heroku dashboard and click New -> Create new app.

As you have previously done to create your Parse App, type your app name, select a Region and click Create app. Heroku will check the app's name while typing it, so be original because your name may already have been taken!

Enter the Resources tab, search for mlab and install the MongoDB plugin as you've done before for your Parse App.
Then you need to clone your dashboard together with the official Parse Dashboard repo on GitHub, so go back to the Terminal, enter the Desktop (cd Desktop/command), type the following command (replace myparseappsdashboard with the name of your new app on Heroku) and hit Enter:
Wait for the Terminal to process your request. When it'll print out something like this:
you'll have your dashboard app folder in your Desktop (in my case it'll be myparseappsdashboard).
You now need to edit some files, which are the following ones:
So open your dashboard folder on your Desktop and start editing parse-dashboard-config.json (inside the Parse-Dashboard folder) with your text editor as it follows:
1 2 3 4 5 6 7 8 9 10 11 12 13 14 15 16 17 18 | { "apps": [ { "appId": "123456789", "masterKey": "123456789", "appName": "My Great Parse App", "iconName": "" }],"users": [ { "user":"<your-username>", "pass":"<your-password>" } ], "iconsFolder": "icons"} |
So, line 4 has the URL to the Heroku app you've previously created and tested, line 5 has its App ID, the line 6 its Master key and the line 7 is where you can type the name of your app in the way you want to see it displayed in the Parse Dashboard. Ignore line 8 since the Parse Dashboard doesn't handle custom app icons yet.
In line 13 you need to set a username to enter your Dashboard later, replace <your-username> with anything you want. Same thing for line 14, replace <your-password> with your own desired password.
Please note that "apps" is a JSON array, so in case you want to add more Parse apps in your Dashboard, just add a comma after the "}" bracket, copy the keys inside the 2 { } brackets and paste them after the comma, as the following example:
1 2 3 4 5 6 7 8 9 10 11 12 13 14 15 16 17 18 19 20 21 22 23 24 25 | { "apps": [ { "appId": "123456789", "masterKey": "123456789", "appName": "My Great Parse App", "iconName": "" },{ "appId": "123456789", "masterKey": "123456789", "appName": "My Second Parse App", "iconName": "" }],"users": [ { "user":"<your-username>", "pass":"<your-password>" } ], "iconsFolder": "icons"} |
Now open index.js with your text editor, go to line 13 and replace the following code:
with this:
Lastly, exit the Parse-Dashboard folder, open package.jsonwith your text editor and paste "parse-dashboard": "^1.0.22" in the "dependencies" section, as it follows:
1 2 3 4 | "dependencies": { "parse-dashboard": "^1.0.22",...... |
You're now ready to deploy your Parse Dashboard to Heroku, so go back to your terminal Window and type the following commands:
1 2 3 4 5 6 7 | cd myparseappsdashboard/heroku config:set PARSE_DASHBOARD_ALLOW_INSECURE_HTTP=truegit initheroku git:remote -a myparseappsdashboardgit add .git commit -am "changes"git push heroku master |
In line 1, I'm entering my dashboard app's folder, but in case you're already inside that directory, just skip that command.
In line 2 is to enable PARSE_DASHBOARD_ALLOW_INSECURE_HTTP.
Line 3 initializes the git commit
Line 4 is needed to remotely connect to your dashboard app on Heroku
Line 5, 6 and 7 are needed to push your changes to Heroku and get your Parse Dashboard ready to be used.
So, if after you'll execute the last command, you'll get something like this:
It means you're ready to use your Parse Dashboard, so open your browser and go to the URL of your Dashboard (you can find it in the Settings tab on Heroku, Domains and certificates section. In my case the link is https://myparseappsdashboard.herokuapp.com/).
You should get the Login window:

Type the username and password you've previously set in the parse-dashboard-config.json file and click LOGIN.
Here you are, you can now see your Parse app and edit data with the classic Dashboard, all for free!


Configure Push Notifications for iOS and Android
If your mobile app offers Push Notifications, then you may want to configure your Parse app to handle them, so enter the index.js file of your app's folder (in this case, mygreatparseapp), scroll down to this line:
and simply insert the GCM Sender ID and Server API Key you've got from enabling your app for Google Cloud Messaging in your own Google developer Console. Your edirt should look like this:
1 2 3 4 5 | // Google Cloud Messaging (GCM)if (process.env.GCM_SENDER_ID && process.env.GCM_API_KEY) { pushConfig['android'] = { senderId: process.env.GCM_SENDER_ID || '1025983000538', // paste your own GCM Sender ID apiKey: process.env.GCM_API_KEY || 'AIzaSyD11IbVbijyIJpR_xvDKbKtydS6F_db5as'}; // paste your own API Key} |
Below this code, you can find:
This is the section dedicated to iOS Push Notifications, so in this case, you first need to create your Development and Production .p12 certificates (please check my profile here on HubPages to find a tutorial about it) and drag those files into your app's folder.
Then, in index.js, you need to set the name of your Development .p12 file. Let's pretend you've called it pushDev.p12, then just replace 'ParsePushDevelopmentCertificate.p12' with 'pushDev.p12' (this is just an example).
Replace 'beta.codepath.parsetesting' with your own iOS app's Bundle identifier (you can get it on the General tab in Xcode) and save the file.
In my app templates packages - those ones that have Push Notifications integrated - I offer a custom main.js file which must be included in the cloud folder of your Parse app's directory:
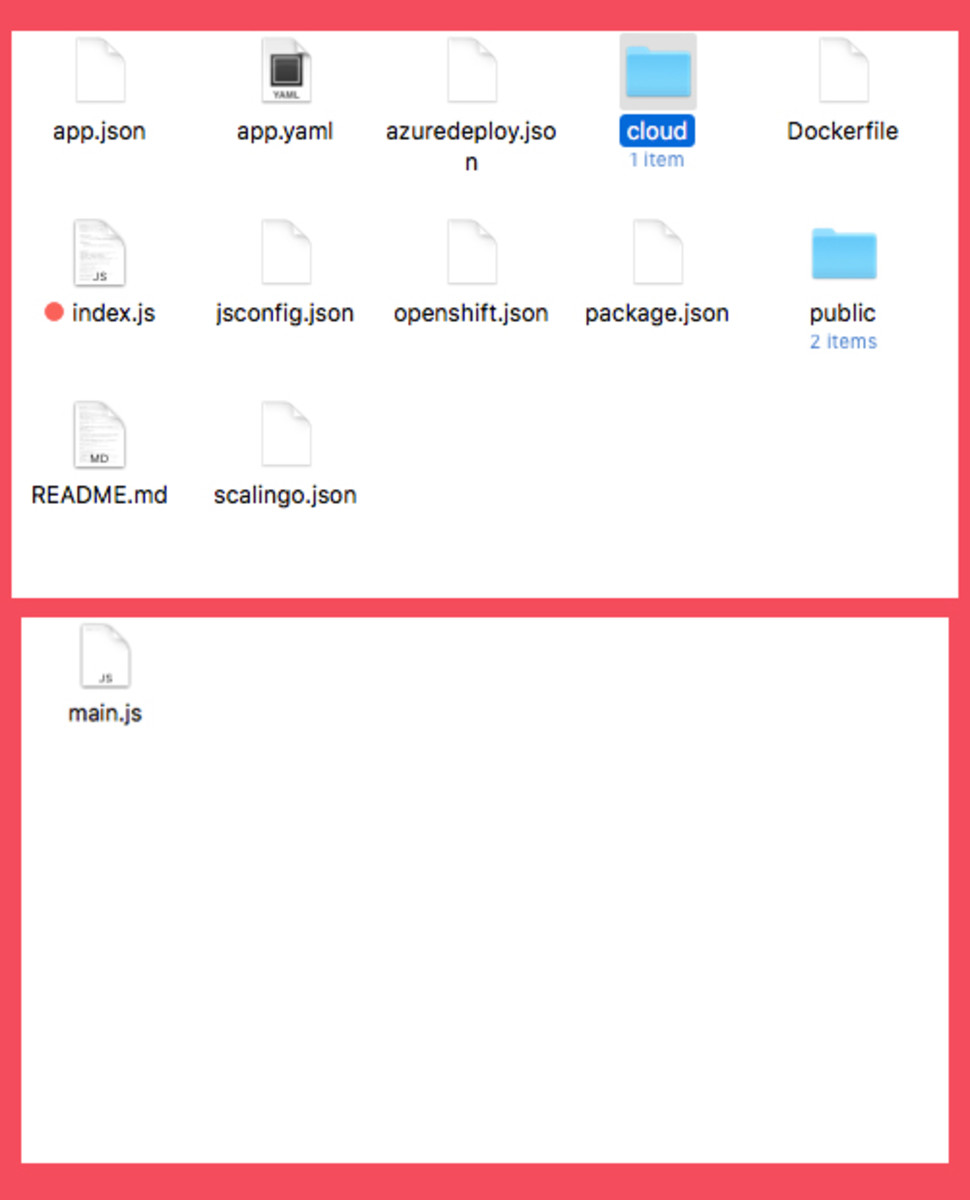
Once you're done, use the Terminal to submit your changes to Heroku again:
1 2 3 4 | cd mygreatparseapp/git add .git commit -am "changes"git push heroku master |
Conclusion
that's it, I hope you enjoyed this tutorial and it was useful for you, this article has been written for those who don't want to use BaaS services like back4app or sashido to host and use the awesome Parse Server backend.
Don't forget to read my other tutorials and check out my portfolio of apps on Codecanyon!
'Heroku' 카테고리의 다른 글
| Heroku CLI 중요 명령어들 (0) | 2018.08.08 |
|---|---|
| nodejs + bower + git(sourcetree) + heroku 사용법 (0) | 2018.08.08 |
| Heroku 클라우드에 node.js 애플리이션을 배포하기 (0) | 2018.08.08 |